Signs and Symptoms
elevated CPK,
paresthesia
pain c passive motion
pain c active flexion
tenderness over compartment
compartment pressure >30-35 mmHg is the level most sources site, though this is probably too low to cause ischemia.
More accurate is a level which is greater than 10-30 of diastolic or MAP depending on which study is used.
cm/water x .73333=mm/hg


Case report of gluteal compartment syndrome from heroin injection, temporally related to rhabdomyolysis (Neurology 1997;48(1):275)
Baseline Compartment Pressures in Isolated Lower Extremity Fractures (J Trauma 2006;60:1037)
Compartment Pressure within 20 of diastolic
or >30 or 45 occurred in a majority of patients with no clinical evidence of the syndrome
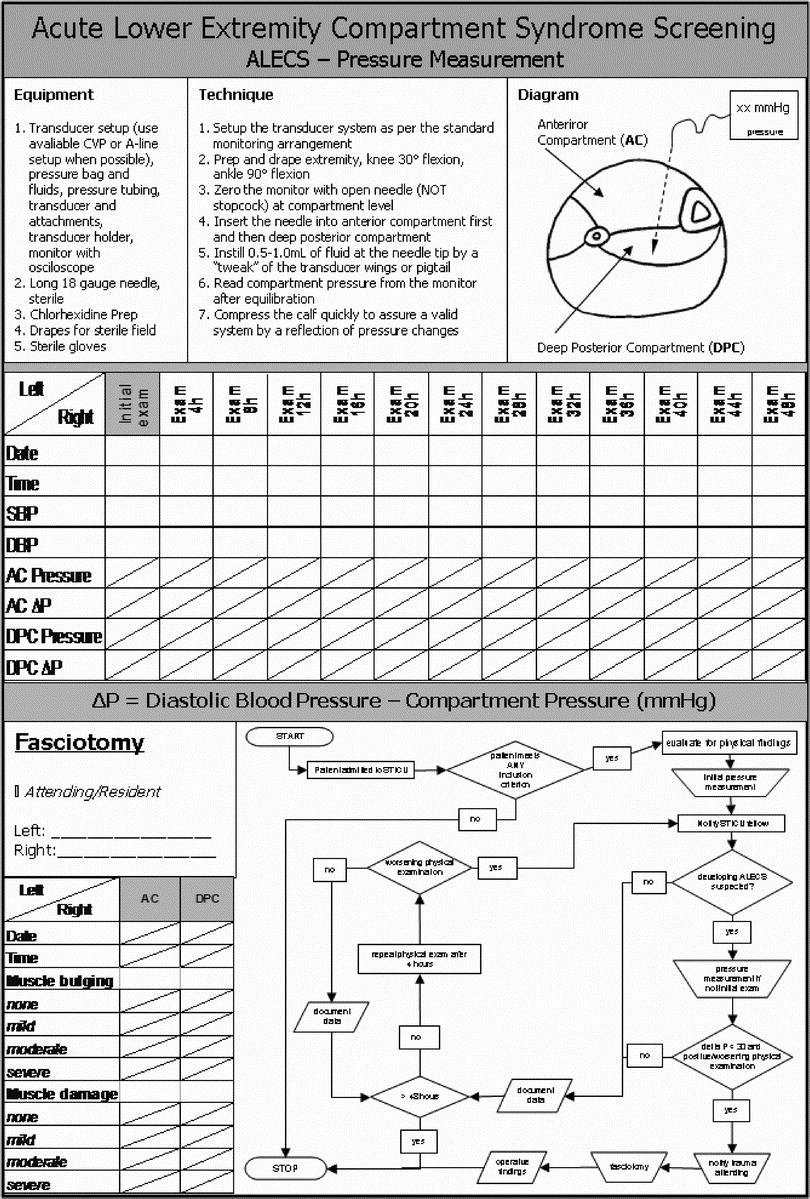
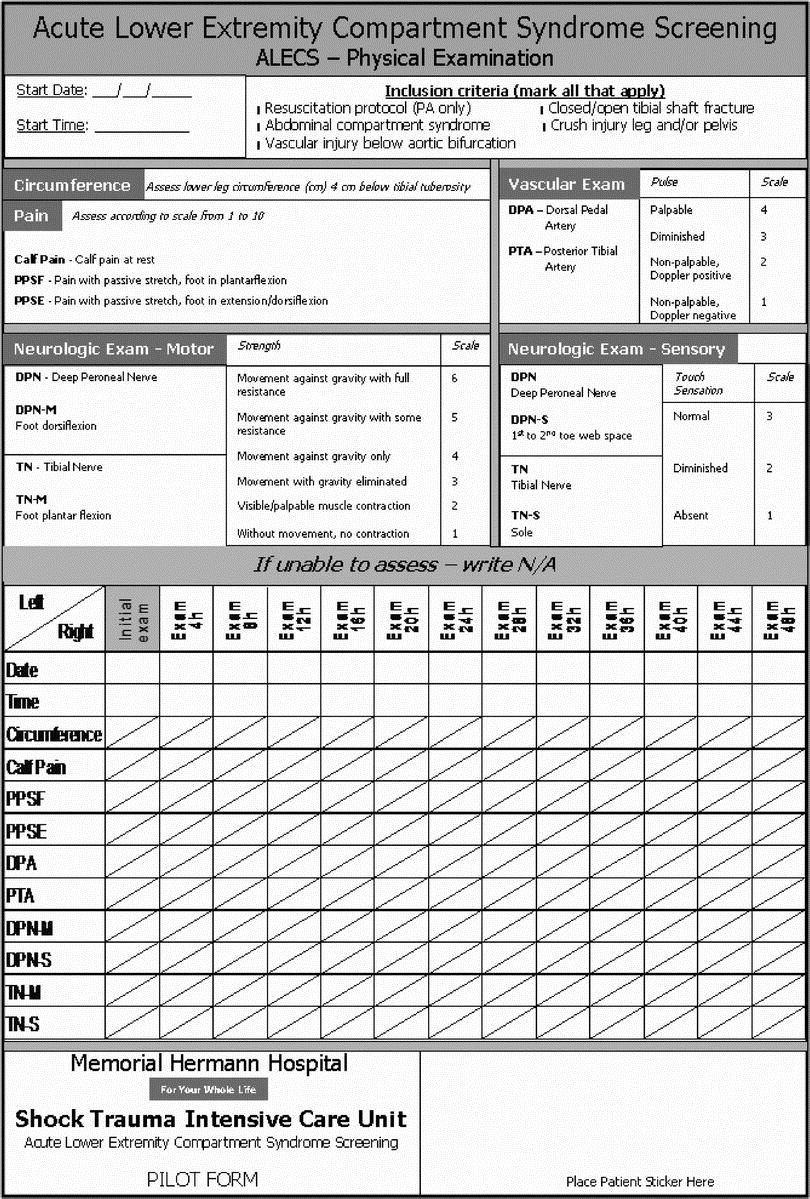
acute lower ext screening protocol (J Trauma Volume 63(2), August 2007, pp 268-275) (2 picts)

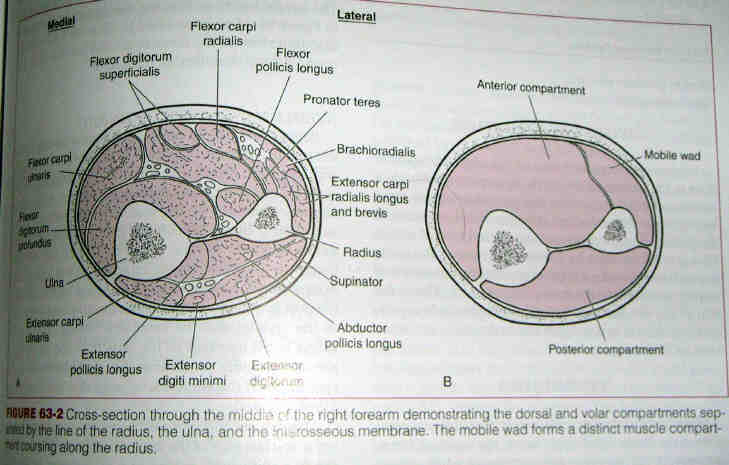
Forearm Compartment Syndrome
From EP Monthly (full article available at http://www.epmonthly.com/cme/current-issue/diagnosing-compartment-syndrome/1/
**********************
There are several methods for measuring intra-compartmental pressures including the simple manometer method, IV pump method and Whitesides technique. The following pictorial will focus on the handheld manometer, “Stryker” device technique.
The forearm contains four compartments; deep volar, superficial volar, dorsal and lateral (also referred to as mobile wad compartment). The volar compartments are at highest risk of compartment syndrome, usually secondary to distal radius fracture in adults or supracondylar fracture in children.
The Rule of Thirds: Between the wrist and the elbow divide the forearm into thirds. The junction of the proximal and middle third is where you want to check the pressures.

The Mobile Wad is made of 3 muscles which include the Brachioradialis, Extensor Carpi Radialis Brevis and the Extensor Carpi Radialus Longus. The Mobile Wad can be palpated by placing the forarm in fully supinated position and having the patient radially deviate the hand at the wrist while palpating at the junction of the proximal and middle thirds of the forarm. The mobile wad identifies the lateral compartment of the forearm.


The Dorsal Compartment is found with the forarm pronated with palm down. Identify the sharp edge of the Ulnar bone at the junction of the proximal and medial thirds of the forarm. Measure 1 cm towards the Radius and you have found the Dorsal Compartment. It contains 5 muscles including the Extensor Pollicus Longus, Extensor Carpi Ulnaris, Extensor Digiti Minimi, Extensor Digitorum and the Abductor Pollicus Longus.

With the forarm supinated find the tendon of the Palmaris Longus if the patient has one. Knowing the Palmaris Longus is proximally attached at the Medial Epicondyle of the Humerus the point of entry is just lateral to the trajectory of this muscle as it crosses the junction of the proximal and middle thirds of the forarm.
Finding the landmarks can be challenging. In a slender and muscular person some landmarks can be seen. In a heavyset individual with swelling and tenderness finding the landmarks can be very challenging, but every effort should be made to correctly identify the different compartments.
The Steps
1. Obtain consent, observe universal precautions and prepare a sterile field
2. Mark entry site with sterile marking pen, using the landmarks in the illustration
3. Anesthetize the skin taking care to avoid injecting into deep tissue
4. Turn the Stryker device on by pressing the switch in upper left hand corner of the unit
5. Remove the needle and diaphragm unit from the sterile pouch
6. Assemble the Stryker device by first connecting a prefilled 3cc syringe to the diaphragm, then attach the needle to other end of diaphragm

7. Open the lid of the Stryker device by lifting the blue latch in the bottom left corner of the unit, place needle/syringe into the unit and gently secure the lid until it snaps closed

8. Point the needle upward and gently flick any air bubbles out of the syringe

9. Zero the device by holding the device perpendicular to the entry point and pressing the blue zero button. “00” will appear on LED screen
10. Remove the needle protective cover and while still holding the device perpendicular to the entry point, gently advance the needle approximately 1-3 cm into the skin, then insert 0.3cc of saline by gently pressing the hub of syringe

11. Hold the device steady and wait for pressures to equilibrate, the number on the LED screen will be the compartment’s pressure
12. Carefully remove the needle and device from forearm
13. Repeat steps 9-12 on the remaining compartments

References
- Kalyani BS, Fischer BE, Roberts CS, et al. Compartment Syndrome of the Forearm: A Systematic Review. J Hand Surg. 2011;36A:535–543
- Olson SA, Glasgow RR. Acute compartment syndrome in lower extremity musculoskeletal trauma. J Am AcadOrthopSurg 2005; 13:436.
- Shadgan B, Menon M, O’Brien PJ, Reid WD. Diagnostic techniques in acute compartment syndrome of the leg. J Orthop Trauma 2008; 22:581.
- Shaffer, R. Compartment Pressure Measurement. The Multimedia Procedure Manual. Retrieved February 1, 2012, from www.emprocedures.com.
- Perron AE, Brady WJ, Keats TE. Orthopedic Pitfalls in the ED: Acute Compartment Syndrome. American Journal of Emergency Medicine. 2001; 19:413.
- Uliasz A, Ishida JT, Fleming JK, Yamamoto LG. Comparing the Methods of Measuring Compartment Pressures in Acute Compartment Syndrome. American Journal of Emergency Medicine. 2003; 21:143.